By Ivan Kwok | 06 January 2026 | 0 Comments
Knowledge of Steadicam
Handbook Introduction
This handbook aims to provide beginners (0→1) and users seeking solutions with a complete, practical, and traceable knowledge system. The content is strictly integrated from real product materials, technical support cases, and industry knowledge. All key information points include original reference sources or dialogue context, striving for objectivity and accuracy.
Handbook Structure:
-
Core Concepts & System Composition: Build the foundational cognitive framework.
-
Mainstream Systems & Purchasing/Operations: Understand the market and master the first steps.
-
Core Skills: Balancing, Tuning & Shooting: Learn the most important operational techniques.
-
In-Depth Technical Diagnosis: Specialized analysis and solutions for typical problems.
-
Real User Support Q&A Transcripts: Complete restoration of real inquiries and official technical support dialogues.
-
DJI Ronin 2 Specific Guide: Complete solution for integration with the THANOS-PROCINE system.
Part 1: Core Concepts & System Composition
I. Three Sentences to Start (Build Foundational Understanding)
-
Physical Principle: These systems are mechanical inertia/damping stabilizers. They distribute the camera's weight to the operator's hips, shoulders, and torso via a Vest + Iso-Arm. A vertical Post and Sled are connected to the arm's end, relying on physical counterbalance and mechanical damping for stabilization. (Knowledge Source: Common industry definition, often elaborated on retailer pages like B&H Photo Video.)
-
Core Difference: Unlike active electronic 3-axis gimbals, Steadicam-style systems rely entirely on physical balance, inertia, and operator skill to achieve stability, excelling particularly in ultra-long, continuous shots. They are complementary tools; the choice depends on shooting needs. (Reference Article: premiumbeat.com's comparison of Gimbal vs Steadicam.)
-
Ecosystem Overview:
-
Classic & Traditional: Tiffen / Steadicam, the inventor and industry standard, with the most comprehensive training system. (Reference: The Tiffen Company website and B&H product pages.)
-
Commercial & Third-Party: Includes Italy's SmartSystem, India's Proaim, and China's DigitalFoto / THANOS-PROCINE. (Reference: Their respective websites: smartsystem.com, proaim.com, and THANOS-PROCINE's https://digitalfoto.cn/thanos-procine-p00928p1.html product page.)
-
High-End Hybrid Solutions: ARRI Trinity / Artemis, which fuses mechanical stabilization with an electronic gimbal, offering five-axis control at the highest complexity and cost. (Reference: arri.com official system description.)
-
II. Core Components (Know Every Part)
-
Vest: The system's load-bearing platform, distributing weight evenly across the operator's torso. High-quality vests focus on adjustability, anti-slip, and breathable design. (Design Reference: Proaim.com product descriptions.)
-
Iso-Arm (Shock-Absorbing Arm): The movable mechanical arm connecting the vest to the post, featuring internal springs or damping. It bears and cushions shocks from operator movement and is key to defining the system's "feel" (balance of stability and flexibility). (Function Reference: Proaim.com.)
-
Post (I-Post / Carbon Post): The vertical rod extending from the end of the iso-arm, used to mount the sled. Commonly an I-shaped aluminum or lighter carbon fiber rod. (Component Reference: B&H Photo Video product categories.)
-
Sled: Contains the camera mounting platform, counterweights, operating handle, and adjustable damping blocks. Its design directly affects the system's ease of use, balance range, and maximum payload capacity. (Component Reference: B&H Photo Video product categories.)
-
Gimbal – Optional: Modern advanced systems can integrate a mechanical or electronic ring gimbal (like ARRI TRINITY) onto the sled, creating a "hybrid" stabilization solution for more complex camera movements. (Solution Reference: arri.com introduction to the TRINITY system.)
Part 2: Mainstream Systems, Purchasing & Basic Operations
III. Mainstream Brands / Systems (Quick Market Awareness)
-
Tiffen / Steadicam (Classic & Authoritative): As the inventor, its system is the industry "textbook," with the richest public documentation, manuals, and training courses. The best starting point for systematically learning principles and standard operation. (Reference: The Tiffen Company website's Steadicam section.)
-
SmartSystem (Italian-Made, Heavy Payload): Known for handcrafted build and powerful modularity (e.g., Matrix, SmartCAM series), designed for medium to heavy cinema camera systems. (Reference: smartsystem.com official product pages.)
-
Proaim (Value-for-Money Entry): Offers affordable and functionally practical vest and arm combinations, a common choice for budget-conscious small teams or individual creators. (Reference: Proaim.com official website.)
-
DigitalFoto / THANOS-PROCINE (Commercial Heavy Payload): A commercial system emerging in recent years, claiming a payload capacity of up to ~35kg / 77lbs, targeting the professional market requiring large cinema cameras and accessories. (Reference: JD.com product page 10197306803064.html and DigitalFoto official website.)
-
ARRI TRINITY / ARTEMIS (Hybrid System Apex): Deeply integrates a mechanical arm with an electronic 3-axis gimbal, providing unparalleled motion control and automation, but at a high price and with a steep learning curve. (Reference: arri.com stabilizer systems page.)
IV. Purchasing Guide (Decision Framework for Beginners)
-
Budget vs. Target Payload: First determine the total weight of your commonly used camera, lens, batteries, monitor, etc. Then choose an iso-arm and vest with a rated payload 20–30% higher than that weight. (Payload Data Reference: SmartSystem, Proaim, THANOS-PROCINE product specification pages.)
-
Ergonomics (Vest Comfort): Fatigue during long shoots depends largely on the vest. Pay close attention to its padding, adjustment range, and breathability. (Experience Reference: Proaim.com vest design descriptions.)
-
Modularity & Accessory Ecosystem: Consider whether the system allows you to change post lengths, add counterweights, or upgrade/add a gimbal and dedicated monitor mount in the future. ARRI and SmartSystem are renowned for their strong modular ecosystems. (Ecosystem Reference: arri.com and smartsystem.com accessory pages.)
-
After-Sales Support & Training Resources: Steadicam (Tiffen) has the most mature training system. Other commercial brands typically provide product manuals and demo videos. For beginners, accessible learning resources are crucial. (Resource Reference: The Tiffen Company training page.)
V. Donning & Initial Setup (Step-by-Step First Steps)
Goal: To achieve comfortable load-bearing, with the iso-arm floating naturally vertically, and the operating handle within a controllable range.
-
Don the Vest: Wear the vest over your clothing, ensuring a snug fit. Gradually tighten all adjustment straps at the chest, ribs, and waist until snug but not restrictive.
-
Attach the Iso-Arm to the Vest: Securely mount the iso-arm to the vest's interface. Check the arm's locking mechanism and spring condition. Beginners can set the tension to the mid-position as suggested in the manufacturer's manual. (Operation Reference: Proaim.com installation guide.)
-
Install the Post and Empty Sled: On the ground, connect the post to the end of the iso-arm, then attach the sled (without camera). Add minimal counterweight and check the arm's balance and rebound.
-
Adjust the Arm's Preload: Adjust the spring tension inside the arm so it smoothly follows and returns when you lift or lower it, without unpleasant bouncing. Different brands have different adjustment mechanisms and scales. (Calibration Reference: Proaim / SmartSystem user manuals.)
-
Mount the Camera: Secure the fully rigged camera (including typical lens, battery, wireless video, etc.) in a central, rearward position on the sled platform.
-
Begin Static Balancing Process: After completing the above steps, proceed to the most critical balancing calibration.
Part 3: Core Skills — Balancing & Shooting Techniques
VI. Balancing — From Static to Dynamic (The Most Important Section)
Balancing is a two-step process: Static Balance (the center of gravity when the camera is stationary) and Dynamic/Operational Balance (stability and damping settings during movement).
A. Static Balance
-
Fore-Aft Balance: By moving the camera forward/backward on the platform or adjusting counterweights at the sled's front, position the system's center of gravity directly below the post. Goal: When you release the handle, the post remains vertical, and the sled doesn't tilt forward or backward.
-
Left-Right Balance: Use lateral balance screws or small side weights to ensure the camera has no lateral tilt.
-
Tilt Balance: Adjust the camera's mounting angle on the platform so the lens axis aligns with the system's vertical center of gravity line.
-
(Standard Procedure Reference: Tiffen / Steadicam official manual with illustrations, also mentioned in B&H educational articles.)
-
B. Dynamic Balance & Damping
-
Damping Blocks/Rubber: Sleds often have replaceable or adjustable soft/hard damping blocks to absorb high-frequency micro-vibrations during shots, directly affecting the "softness" or "harshness" of the image.
-
Arm Rebound/Preload Fine-Tuning: Feel the arm's feedback while walking and further fine-tune the spring tension to ensure it is neither stiff (causing jerky motion) nor overly soft (causing wobble) during movement.
-
Operating Handle Position: The closer the handle is to the camera's center of gravity, the more responsive the control; a longer handle amplifies every micro-movement.
-
Field Testing & Iteration: This is the most critical step. Wear the full system and perform actual walking, stair climbing, turning, etc. Then, based on the issues felt, go back and fine-tune balance, damping, and arm tension. This is an iterative process. For hybrid systems like ARRI Trinity, electronic gimbal calibration is also required. (Advanced System Reference: arri.com instructions for TRINITY calibration.)
VII. Basic Shooting Techniques (Movement Breakdown & Practice)
-
Correct Walking Technique (Most Critical): Use a heel-to-toe rolling gait, maintain a small stride, and keep your center of gravity steady. Look at your path, and keep your head and upper body as stable as possible. Practice walking and turning extensively. (Technique Reference: B&H Explora channel instructional videos.)
-
Starting & Stopping: To start, stabilize the handle first, then accelerate slowly over 3-5 small steps. To stop, similarly decelerate over 3-5 steps, using a slight knee bend to absorb the final momentum.
-
Turning: Use your body (feet and hips) to rotate and turn the system, rather than twisting the handle violently. Always strive to keep the post vertical.
-
Ascending/Descending Stairs/Steps: Lower your center of gravity, ideally turn sideways, and take small, shuffling steps. Use a ramp instead of stairs if available.
-
Low-Mode / High-Mode Switching: First master operation at normal height, then practice lowering (low-mode) or raising (high-mode) the post. Re-microbalance after any height change.
-
Shot Language Application: Learn and practice slow push-ins, lateral follows, controlled arc movements. The essence of a Steadicam system is creating cohesive, rhythmic long takes, excelling at subject following. (Creative Concept Reference: premiumbeat.com articles on Steadicam shot language.)
VIII. Lens & Accessory Recommendations
-
Lens Choice: Wide-angle to medium telephoto (e.g., 24–85mm) are Steadicam-friendly focal lengths; super-telephoto lenses place extreme demands on balance and focus pulling.
-
Follow Focus: Strongly recommended to use a wireless follow focus system or have a dedicated focus puller, especially when using large apertures or long lenses.
-
Monitor & Video Link: Mount the monitor on the sled or via an extension arm to ensure convenient composition viewing during shots. Brands like SmartSystem and Proaim offer dedicated monitor mount accessories. (Accessory Reference: smartsystem.com and Proaim.com accessory lists.)
IX. Daily Maintenance & Safety
-
Regular Inspection: Before each use, check all springs, screws, pins, and connection points on the iso-arm for tightness, wear, or fatigue.
-
Cleaning & Care: Regularly clean carbon fiber posts and rails with a soft cloth to prevent dust and grit from entering damping components.
-
Never Overload: Never exceed the manufacturer's stated maximum payload. Overloading can permanently damage the iso-arm or vest structure. (Safety Reference: Load warnings in manuals from brands like smartsystem.com.)
-
Training & Warm-up: Novice operators are prone to fatigue or injury from poor posture or prolonged load-bearing. Warm up your shoulders and back before operating, and schedule adequate breaks during shoots.
Part 4: In-Depth Technical Diagnosis (Real Problem Solutions)
X. Special Diagnosis: Why does the DJI Ronin 2 keep vibrating when mounted on the THANOS-PROCINE Steadicam?
Problem Recap: The user mounted a DJI Ronin 2 electronic 3-axis gimbal on a THANOS-PROCINE vest + iso-arm system, resulting in persistent vibration.
Global Phenomenon: This issue is very common in Steadicam communities and is known as "Gimbal-induced oscillation." It is not a fault unique to THANOS-PROCINE; it is a system coupling problem.
Core Conclusion: The vibration root cause is a "resonance" or "counteractive compensation conflict" between the Ronin 2's active motor correction system and the passive spring-damping structure of the mechanical iso-arm. Simply put, the gimbal constantly tries to "correct" the frame, while the mechanical arm "floats and buffers," and their movement frequencies conflict, amplifying the vibration.
Why is Ronin 2 Particularly Prone to This?
-
Extremely High Motor Torque: Reacts aggressively to tiny offsets.
-
Too Small Deadband Setting: Constantly corrects for extremely细微 (e.g., 0.5°) swings, exciting the arm's natural frequency.
-
Mechanical Arm Has a Natural Frequency: The spring system of THANOS-PROCINE (and all mechanical arms) has a natural vibration frequency (e.g., 1.5–2.5Hz). If this coincides with the gimbal motor's PID control frequency, resonance occurs.
-
Balance Deviation: Even minor static imbalance causes the gimbal motors to continuously "push against" a force, making oscillation easier to trigger.
-
Hardware & Setup: Long post length, overly stiff arm tension, and loose mounting joints all amplify vibration.
Systematic Solution Steps (Prioritized):
-
Ensure Perfect Static Balance of the Ronin 2: With power off, the gimbal should remain still at any angle. Poor balance is the root cause of 50% of vibration issues.
-
Adjust Ronin 2 Motor Parameters (Key!):
-
Perform "Auto Tune," but DO NOT use the default "High" strength.
-
Optimize for Steadicam Mode: Significantly lower "Stiffness," Increase "Filter," Significantly increase "Deadband." Increasing the deadband allows the gimbal to "ignore" minor shakes, breaking the resonance cycle.
-
(Example Starting Values: Stiffness: Lower setting; Filter: Higher setting; Deadband: Increase to 3-5)
-
-
Optimize Mechanical Arm Settings:
-
Reduce the iso-arm's preload by 10-20% from its previous setting, making it "softer."
-
Avoid using the hardest damping plates.
-
Ensure balanced tension across multi-segment arms.
-
-
Shorten the Post Length: The post is a lever. Shortening it by 5-10 cm can dramatically reduce vibration amplitude.
-
Check All Hardware Connections: Tighten all interfaces: handle, post connector, gimbal baseplate, quick-release plates, etc.
-
Correct Walking Technique: Use the standard "Crab Walk," avoid crossing feet and shoulder-driven movement, and use knees for cushioning.
Rapid Diagnosis Method:
-
Gimbal Power-Off Test: Walk with only the vest + arm + post + gimbal (powered off). If no vibration, the problem is gimbal parameters. If vibration persists, it's a mechanical setup issue.
-
Gimbal Standalone Test: Power on the Ronin 2 on a tripod. If stable, it's a resonance issue when combined with the arm. If it vibrates on the tripod, it's a gimbal self-balance or parameter issue.
One-Sentence Summary: Vibration of Ronin 2 on a Steadicam is a classic system interaction problem. It can almost always be resolved through comprehensive tuning: re-balancing, optimizing gimbal PID (lower stiffness, increase deadband), softening the iso-arm, and shortening the post.
Part 5: Real User Support Q&A Transcripts
XI. User Practical Questions & Official Answers (Complete Restoration)
User Inquiry (Context: Post-training preparation for first real job):
"I took a steadicam course and now I know how the system works but have a few queries if you have the time to answer them.
Where should the lower pad sit, on the lower back or a tad lower at the waist? (Differs from the Tiffen I trained with).
I'm a biggish guy and have really tightened the vest a lot, but it still feels loose at the waist, any suggestions?
I'm getting some arm bounce. I balanced it and the dynamic balance seems good. Should I be adjusting the two arm knobs to loosen it? Will that lessen the horizontal bouncing? Or is the issue somewhere else in the chain?
I'm also getting a little side dip when I walk. Is this likely my operation or could it be something has gone off balance?"
Official Technical Reply:
Congratulations on completing the course and landing your first job! Your questions are spot-on and critical for professional tuning. We treat the system as a chain: the Vest is the foundation, the Arm is the suspension, and your Operation is the steering wheel.
1. The Vest: The Foundation
Lower Pad Position: Crucial! The hip pad must sit low and firmly on top of your hip bones (iliac crest), not on the soft tissue of your lower back. Let the skeleton bear the weight.
Fixing the "Loose" Feeling: You've identified a common oversight. The THANOS vest uses a two-stage fastening system:
Action: Loosen all straps completely. Put the vest on, fasten the inner belt snugly, then pull the outer Velcro straps (especially the hip and cross-back ones) as tight as you possibly can. The vest should feel like an extension of your body that cannot move independently.
Inner Belt (with buckles): Bears the primary load. Needs to be snug.
Outer Velcro Straps (The Secret Weapon): Critical. Their job is to CINCH the entire vest and inner belt down onto your body to prevent all rotation and shifting.
2. Arm Bounce & Side-Dip: Tuning the Suspension
"Bounce" is likely from unoptimized arm lift tension; "Side-Dip" is often a combo of arm balance and walking technique.
THANOS-PROCINE Arm Specific Two-Step Tuning:
Step 1: Coarse Adjustment (Using the Red Wrench)
Purpose: Set the baseline spring tension for your sled's weight.
Action: Locate the two hex sockets inside the back end of each arm section. Use the provided red wrench to adjust preload. Clockwise increases tension (heavier sled), Counter-clockwise decreases (lighter sled).
Goal: Get the arm segments floating in roughly the right range so the fine-adjustment knobs become effective.
Step 2: Fine Adjustment (Using the Circular Knobs)
Purpose: Final precise tuning.
Action: With the sled on and in operating stance, observe the two arm segments. Use the circular knobs on top of each section: Clockwise INCREASES tension (if arm sags or feels too soft/bouncy), Counter-clockwise DECREASES (if arm pushes up too hard).
Final Goal: Both the Forearm and Upper Arm sections should rest slightly above horizontal (5-10 degrees) when the sled is at operating height, moving together smoothly through the full boom range without "bounce-back" or "lock-up."
Side-Dip Specific Check: If the sled consistently pulls to one side, use the side-to-side balance knob on the arm's socket block (where it connects to the vest) to center it.
3. "Side-Dip" & Your Operation
Even with a perfect arm, walking technique can cause a dip.
Solution: The "Crab Walk." Never cross your feet.
Keep feet shoulder-width apart.
Point your lead foot in the direction of travel.
Move by bringing your back foot up to your front foot, then stepping out again with the lead foot. This keeps hips and shoulders level.
Pre-Flight Checklist for Monday:
Vest: Hip bones -> Inner buckles snug -> Outer Velcro CRANKED tight.
Arm Tension: Follow Red Wrench (Coarse) -> Circular Knobs (Fine) until arms float just above horizontal.
Arm Balance: Fine-tune side-to-side knob for neutral feel.
Practice: Spend 15 minutes focused "crab walking" to build muscle memory.
You are going through the exact process every great operator experiences. THANOS-PROCINE is a beast, and once mastered, it will capture stunning shots for you. Good luck on Monday!
Part 6: DJI Ronin 2 × THANOS-PROCINE Specific Guide
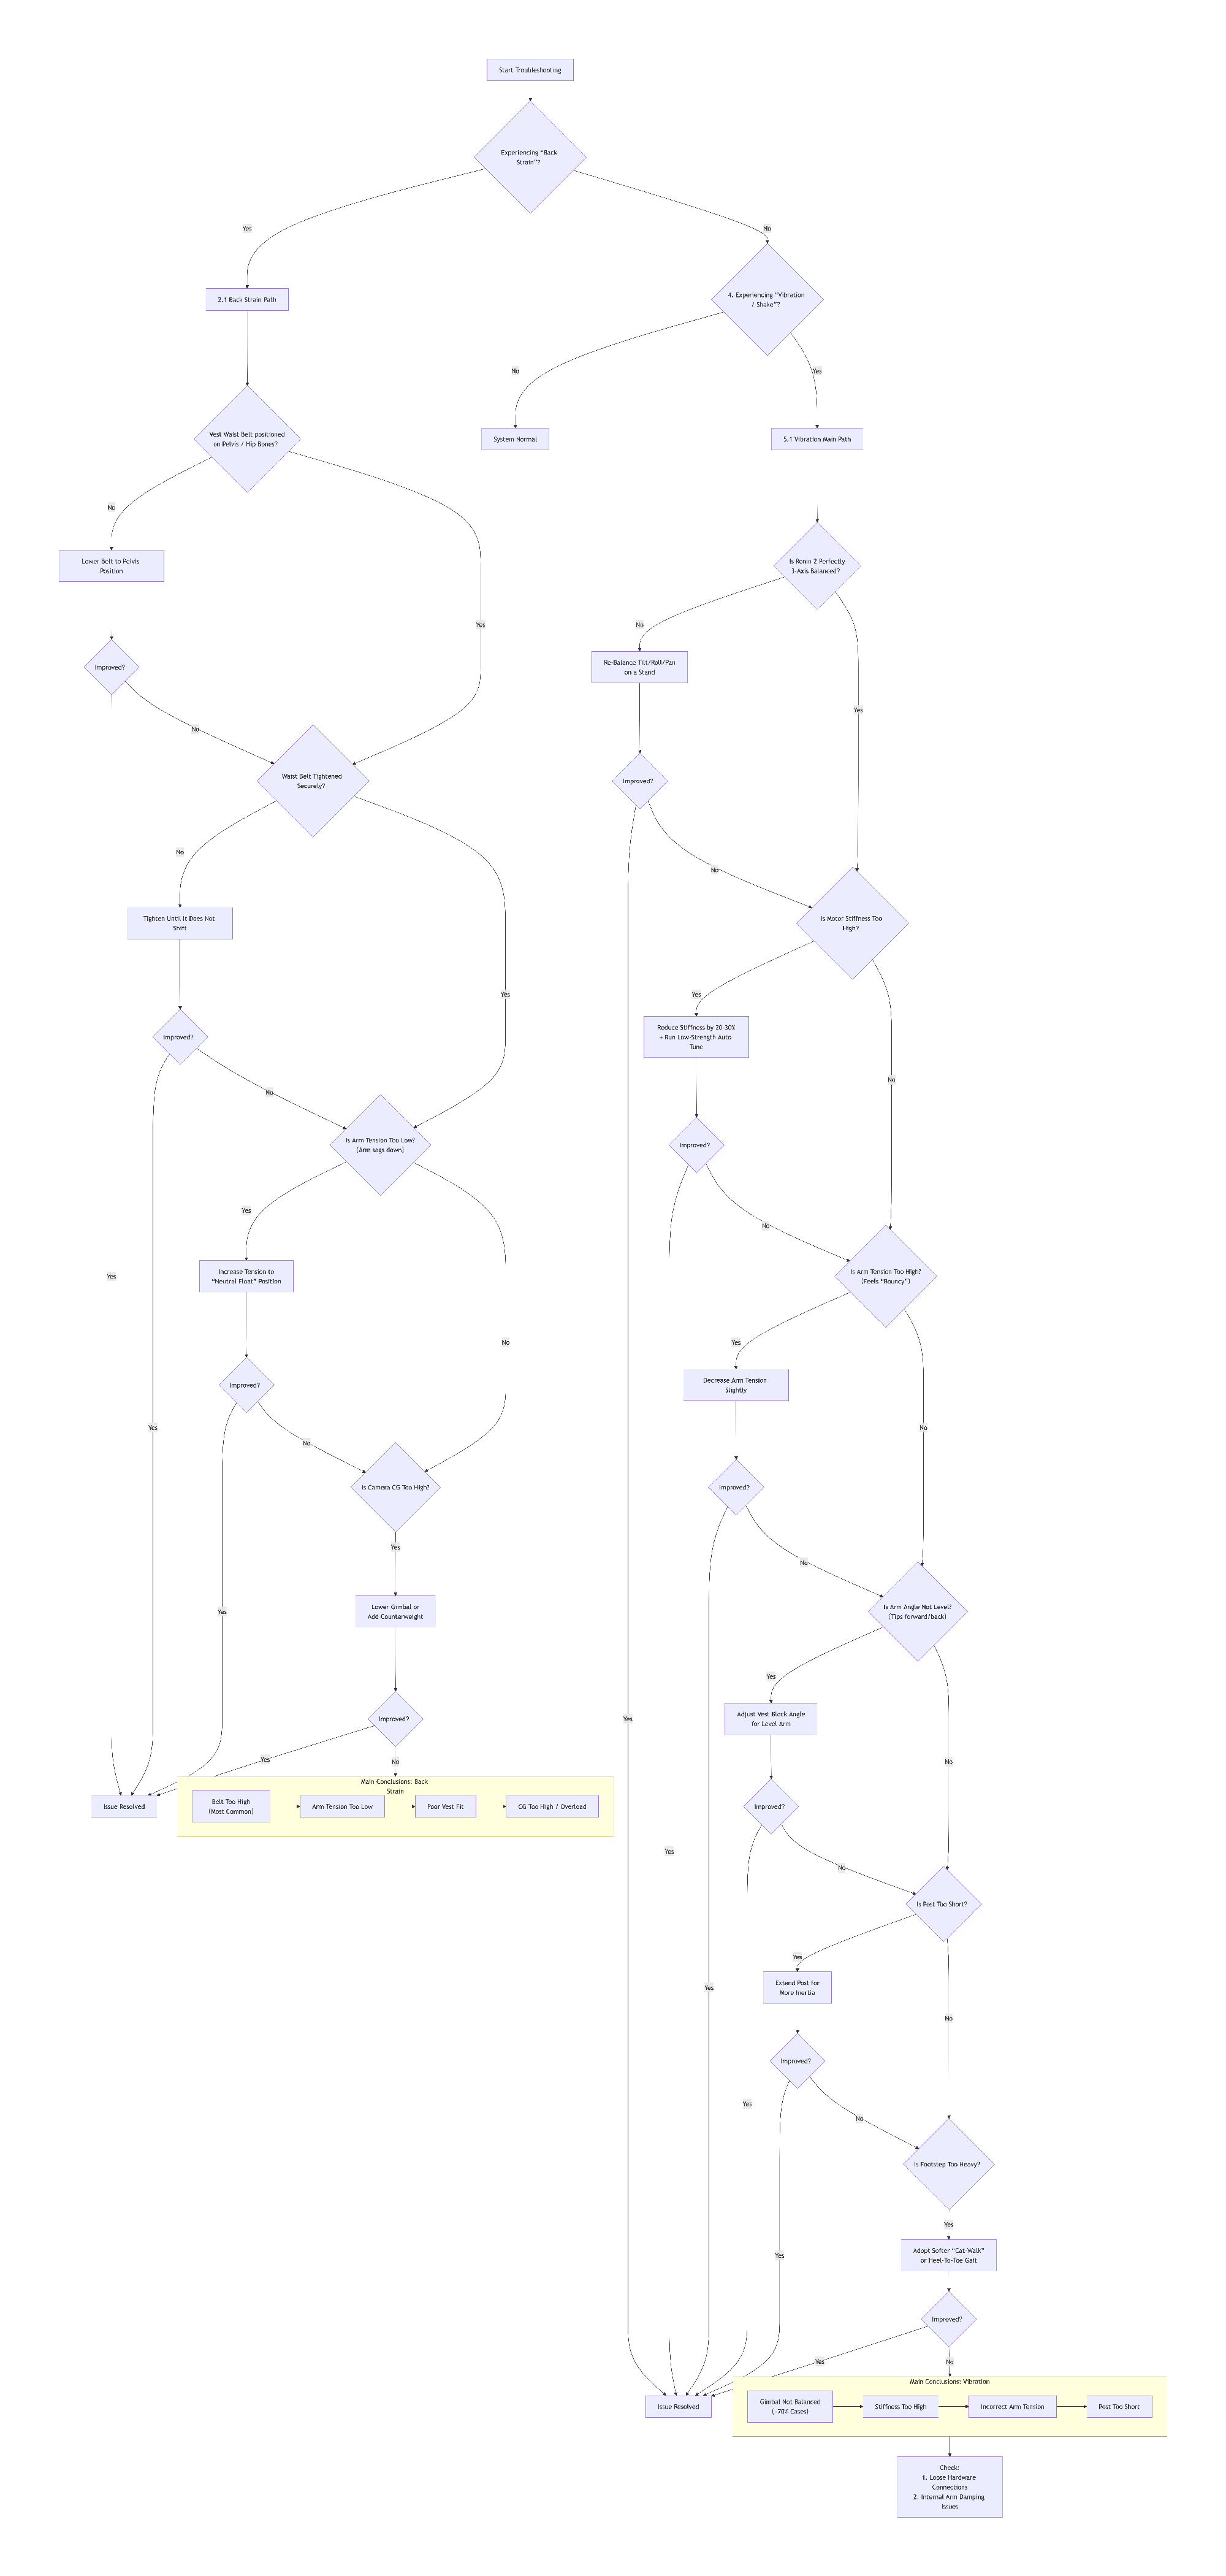
XII. Complete Installation, Tuning & Vibration Troubleshooting Guide
I. Overview
This guide is designed to help users properly integrate the DJI Ronin 2 gimbal system with the THANOS-PROCINE Steadicam (four-axis stabilizer arm) system. It provides a systematic approach to installation, balancing, and troubleshooting. Correct operation is key to ensuring stable footage, preventing equipment damage, and avoiding operator injury (such as lower back strain).
Primary Goal: To achieve mechanical and electronic synergy between the Ronin 2 and the THANOS-PROCINE system, eliminating vibration for smooth, stable motion shots.
Consequences of Incorrect Setup or Tuning:
-
Filming Impact: Persistent or intermittent noticeable vibration/shaking in the footage.
-
Operational Impact: The system feels unstable overall and difficult to control.
-
Ergonomic Impact: Causes abnormal lower back strain, soreness, or fatigue for the operator.
II. Standard Installation & Tuning Procedure
Step 1: Correctly Don the Vest (The Foundation of Stability & Comfort)
The quality of the vest fit directly determines load-bearing efficiency, operational stability, and comfort.
-
Waist Belt Position (Most Critical): It must be tightly secured on the upper ridge of the pelvis (hip bones). The body's load should be borne primarily by the pelvic skeleton, not the soft tissue of the lower back (lumbar spine).
-
Important Note: If the waist belt is positioned too high, it forces all weight onto the lumbar spine, which is the most common cause of severe lower back pain and system instability.
Step 2: Install & Pre-Tune the THANOS-PROCINE Arm
-
Firmly insert the arm into the dedicated interface on the front of the vest and ensure the locking mechanism is fully engaged.
-
With no payload attached, adjust the arm's pre-tension so it roughly maintains a horizontal floating state. Check that all joints rotate smoothly without stiffness or catching.
-
Note: The arm's initial angle (too high or too low) directly affects balance under load and can introduce vertical-axis resonance.
Step 3: Mount the Ronin 2 to the Sled
-
Ensure the sled's Post is vertical.
-
Using a reliable quick-release plate, securely mount the Ronin 2 to the sled platform. Check and tighten all screws and locks to ensure no play between the gimbal and sled.
Step 4: Ronin 2 Independent Three-Axis Balance (Crucial)
Before mounting the entire sled assembly to the arm, you must achieve perfect three-axis static balance for the Ronin 2 on a workbench or tripod.
Balance Checklist:
-
Tilt Axis: The camera remains stationary at any tilt angle, with no tendency to rotate on its own.
-
Roll Axis: The camera is perfectly level, not leaning to either side.
-
Pan Axis: When the gimbal is gently pushed, it should rotate smoothly and come to a gradual, natural stop without favoring one side.
-
Core Principle: Any minor axis imbalance will be significantly amplified by the physical leverage of the Steadicam system, becoming a source of vibration.
Step 5: System Integration & Fine-Tuning Arm Tension
-
Attach the balanced Ronin 2 sled assembly to the end of the arm.
-
Adjust the arm's spring tension (via knobs or a dedicated tool) until the arm can just support the entire load, stabilizing in the mid-range floating position of its travel.
-
Excessive Tension: Causes the system to "bounce," producing high-frequency vibration.
-
Insufficient Tension: Causes the sled to sag, transferring the full weight onto the operator, resulting in lower back pressure and fatigue.
-
III. Vibration Diagnosis & Solutions
Issue ①: Ronin 2 Motor Stiffness Set Too High
-
Symptom: Persistent high-frequency jitter or a "humming" sound.
-
Cause: The powerful Ronin 2 motors, operating at high Stiffness, attempt to "fight" the natural floating of the mechanical arm, creating antagonistic oscillation between the electronic and mechanical systems.
-
Solution:
-
Run the Auto Tune in the Ronin 2 settings, but set the strength to Low (approx. 20-30%).
-
Manually enter the advanced motor settings and gradually reduce the Stiffness values for the Pan, Tilt, and Roll axes until the vibration ceases. This is the most effective fix for this issue.
-
Issue ②: Slight Camera/Lens Imbalance
-
Symptom: Regular wobbling during specific movements (e.g., lateral panning).
-
Cause: The Steadicam system amplifies any remaining static imbalance on the gimbal.
-
Solution: Remove the sled from the arm and finely re-balance all three axes of the Ronin 2 on a bench. Use counterweights if necessary for micro-adjustments.
Issue ③: Incorrect Arm Spring Tension
-
Symptom:
-
Excessive Tension: The system has an up/down "bouncy" feeling when walking.
-
Insufficient Tension: The system feels "saggy," is hard to operate, and puts pressure on the lower back.
-
-
Solution: Re-tune the tension per Step 5, aiming for neutral, smooth suspension of the load within the arm's travel range.
Issue ④: Incorrect Vest Fit
-
Symptom: Vibration accompanied by abnormal lower back soreness and overall control instability.
-
Cause: The waist belt is not on the pelvis, causing muscle compensation and abnormal force transfer.
-
Solution: Loosen the vest completely. First, lower the waist belt to the correct pelvic position and tighten it, then adjust the shoulder and chest straps. Ensure skeletal load-bearing.
Issue ⑤: Arm Angle or Smoothness Issue
-
Symptom: Vertical-axis vibration accompanied by a sense of mechanical friction.
-
Cause:
-
The arm's initial angle is not level.
-
Lack of lubrication or resistance in the arm joints.
-
-
Solution:
-
Adjust the angle of the vest's interface block so the arm is closer to level when unloaded.
-
Inspect and maintain all arm joints to ensure smooth movement.
-
Issue ⑥: Sled Post is Too Short
-
Symptom: High-frequency, small-amplitude jitter.
-
Cause: A short post reduces the inertia of the entire suspension system, making it more susceptible to resonance from minor disturbances.
-
Solution: Appropriately extend the sled post to increase the system's rotational inertia, which can effectively dampen high-frequency jitter.
IV. Special Diagnosis for "Horizontal Tilt (Roll Drift)"
When Ronin 2 on THANOS-PROCINE exhibits a slow horizontal tilt (Roll axis drift), especially when a DJI wireless video transmitter is connected, 99% of the time it is a typical phenomenon caused by electronic system calibration or minor center-of-gravity offset. It can be resolved via the following steps:
-
Complete Calibration After Connecting Transmitter (Key): With the transmitter, battery, and antenna all installed, place the gimbal on a perfectly level surface, perform "System Calibration," then restart.
-
Re-Fine-Tune Roll Axis Balance: Ensure the camera does not automatically return to center at any Roll angle. This may require micro-adjusting the transmitter position or adding small counterweights.
-
Reduce Roll Axis Motor Strength (Stiffness): Manually lower the Roll axis Stiffness value by 10-25%, then run a low-strength Auto Tune.
-
Increase Roll Tolerance (Deadband): Appropriately increase the Roll Deadband to account for the micro-float of the vest system.
-
Check Cable Tension: Ensure no cables are exerting continuous pull on the Roll axis.
V. Official Summary
When the DJI Ronin 2 is used with a wireless video transmitter and mounted on the THANOS-PROCINE vest system, minor Roll axis drift or vibration typically stems from parameter mismatch with the usage scenario, not from a fault in the mechanical arm or vest system. Through the correct calibration process and parameter settings, a stable, reliable professional shooting experience can be achieved.
Handbook Conclusion: This handbook is a starting point for a dynamic knowledge base. Stabilizer operation is a skill deeply combining theory and practice. Continuous practice, careful sensing, and the courage to seek support from

Leave a Reply
Your email address will not be published.Required fields are marked. *